Dataset
Through this item, you can define data sets used in the report.
The concept of Dataset:
A dataset is a two-dimensional view, which is the data source of the report. The dataset can be obtained from a SQL query on the database or from a data file of different structure. It doesn’t matter for the report engine where data in the data set comes from. It only handles data in the data set for report computation.
Defining a Dataset:
Click Report -> Dataset or press F11 to open the following “Dataset Config” interface:
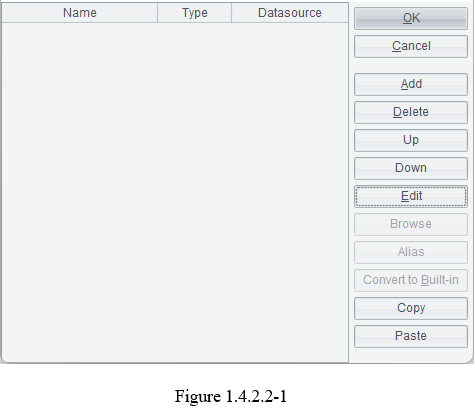
In the above interface, click “Add” button to add a data set; “Delete” button to delete a selected data set in the data set list; “Up” or “Down” button to change the position of a data set in the data set list; “Edit” to modify definition of a selected data set in the list; “Browse” to view data in a data set; “Alias” to give alias to a field in a data set; “Convert to Built-in” to convert an external data set to a Built-in one (A Built-in data set is one whose report data is stored in the report template); “Copy” to copy a selected data set (press Ctrl to copy multiple data sets); and open another report and click “Paste” to paste the copied data set(s) to their “Dataset Config” interface.
You can also create a data set through New Report Wizard during report making by clicking File -> New Report, as shown below:
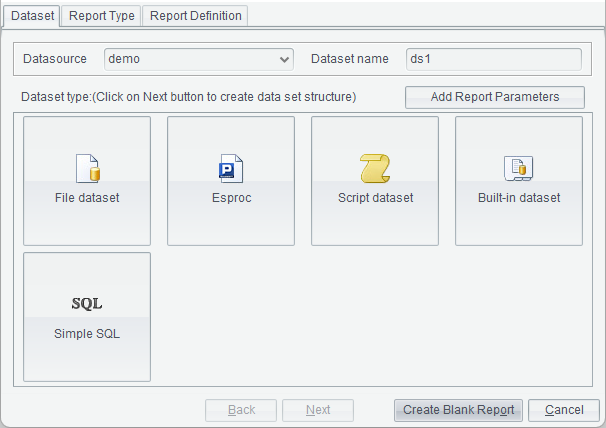
Select a data set type for the new report, or direcly click “Create Blank Report” to generate an empty report.
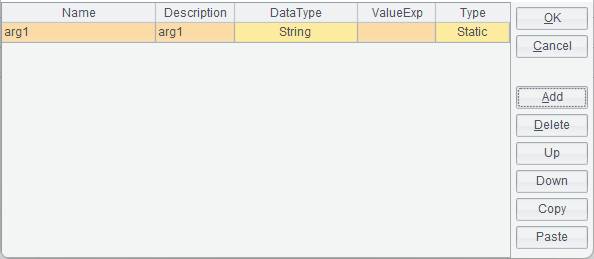
Note: If you select the SQL type data set and such a data set has parameters, you need to first add parameters in “Parameter Editor” interface:
Dataset type:
ReportLite offers several types of data sets, including Simple SQL, Esproc, Script dataset, File dataset and Built-in dataset.
The choice of Simple SQL means that data originates from the database. A SQL statement is used to retrieve data meeting the specified condition from the database and generate a data set. Yet this type of data set does not require writing the SQL statement themselves. There is the visualized wizard interface through which users can select a query condition and the SQL statement is automatically generated. The data set is fit for users who are not familiar with SQL statements.
● Example: Create a simple SQL data set based on ORDERS table and ORDERDETAILS table.
1. On the “Dataset Config” dialog (as shown in figure 1.4.2.2-1), click “Add” button to get “Define Dataset Type” dialog, as shown below:

2. Select “Simple SQL” type and click “OK” to get into “SQL Editor” interface, as shown below:
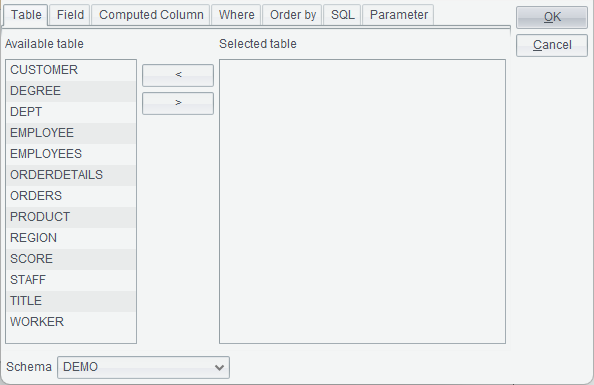
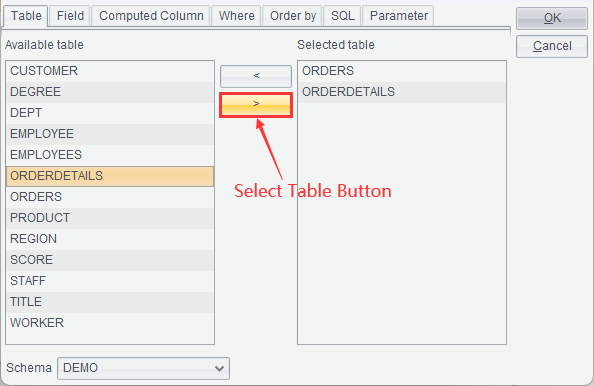
3. Select an option in the drop-down list of “Schema”, and select a data table under the “Available table” into “Selected table” through arrows between the two boxes (as shown below) or double-click a data table name to select the table.
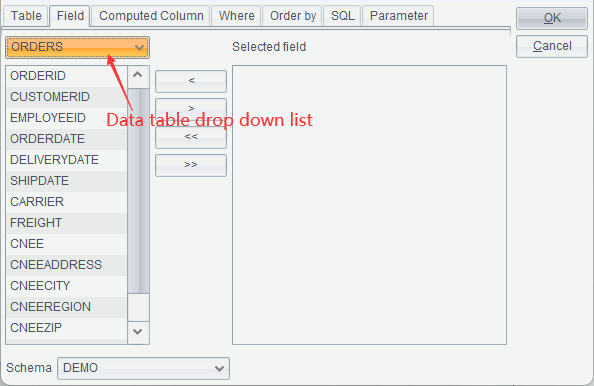
4. Switch to “Field” tab, on which you select the corresponding data table in the data table drop-down list, where all available tables are listed, and then select desired fields into “Selected field” box through arrows between it and the “Available field” box, or double-click a field name to select the field.
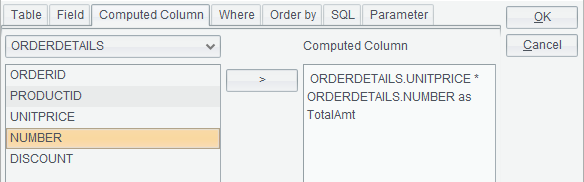
5. Switch to “Computed Column” tab, on which you edit an expression by selecting the desired fields to “Computed Column” box through the arrow on the middle of the edit interface.
Here’s an example. The ORDERDETAILS table has UNITPRICE field and NUMBER field and we want to get the product of unitprice and number for each order. To do this we edit an expression under “Computed Column” – ORDERDETAILS.UNITPRICE * ORDERDETAILS.NUMBER as TotalAmt, as the following figure shows:
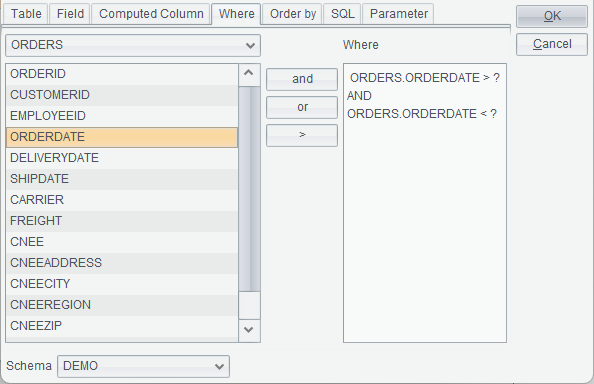
6. Switch to “Where” tab, on which you edit a conditional expression by selecting the desired fields to “Where” box through the arrow on the middle of the edit interface. To use parameters in the SQL statement, write question marks at the corresponding places according to the SQL syntax.
For example, suppose we want to get order records where order dates are within the specified time period from the ORDERS table, we can edit a conditional expression in “Where” box, such as ORDERS.ORDERDATE > ? AND ORDERS.ORDERDATE < ? , as shown below:
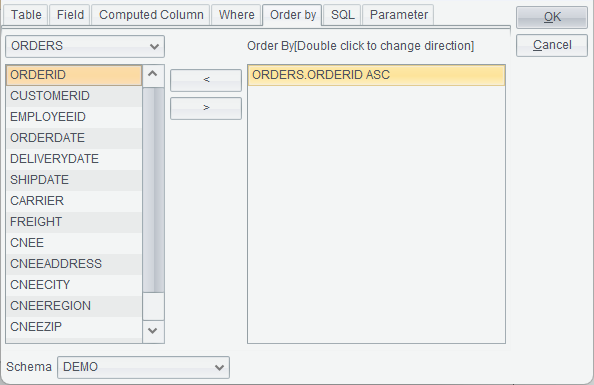
7. Switch to “Order by” tab, on which you selected fields to be sorted to “Order By” box through arrows in the middle of the edit interface, as shown below:
8. Switch to “SQL” tab to view the edited SQL statement. According to SQL syntax, question marks are automatically generated at places where parameters are needed. In the above query condition, two question marks are used, as shown below:

9. Switch to “Parameter” tab, on which we write parameter names or parameter expressions (not preceded by the equal sign) according to the order of question marks. Here you do not need to take care of data types of the parameters because they will be automatically converted by the system, as shown below:
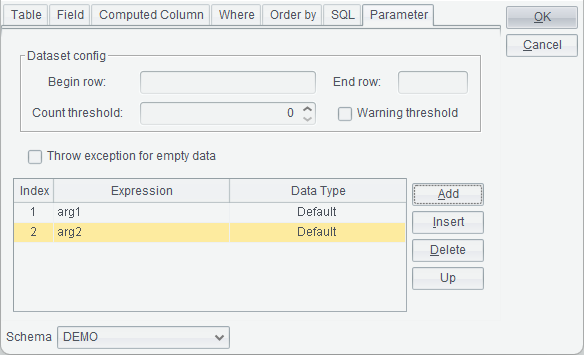
Dataset config: For retrieving data by rows for the data set.
Begin row and End row: For controlling the number of rows in the data set. If a large volume of data is needed for report making, you can change the begin row and end row through parameters. Generally speaking, both the begin row and end row are input parameters and row numbers are controlled through those parameters. It makes no sense to enter constants.
Count threshold: When generating a data set from a large volume of data, the system often responses very slowly. We set a threshold value (int) and when the actual number of records retrieved exceeds the value the computation stops. The default threshold value is 0, meaning there is no limit to the number of retrieved records.
Warning threshold: By checking this option, the number of records to be retrieved will be computed, and judged to see whether it exceeds the threshold number or not before the records are used to generate a data set. If the option is not checked, the data set will be directly generated, during which if the number of records exceeds the threshold value the generation process will be terminated and the data set will be emptied.
Note: The two options – “Count threshold” and “Warning threshold” become invalid when the to-be-generated data set is big.
10. Click “OK” button to go back to “Dataset Config” interface. If you don’t want to use the default data set name, you can rename the data set manually. You can also select a different data source. Then click “OK” button to finish define the data set.
An Esproc data set refers to a data set whose data is obtained from an esProc file. The result of computing the esProc file is returned as the data set for ReportLite through return statement or without it (without the return statement and if the last statement of the esProc file is held in an assignment cell, its result will be automatically returned).
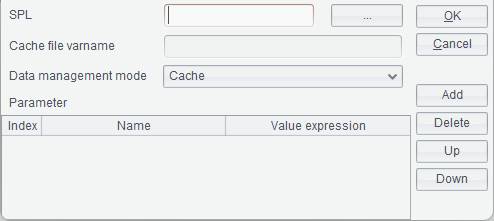
Below is “esProc dataset” interface:
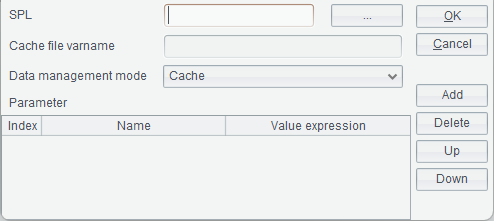
SPL: Click
![]() button after “SPL” to
select an esProc file (whose extension is .splx/.spl./.dfx).
button after “SPL” to
select an esProc file (whose extension is .splx/.spl./.dfx).
An esProc file path can be an absolute one or a relative one. A relative path is relative to the search path configured in Tools -> Options -> Esproc options. The property is consistent with splPath path in Esproc in raqsoftConfig.xml. Do not precede a slash / before a relative path when using it.
Cache file varname: The Cache file varname corresponds to buffer file variable in the esProc file.
Data management mode: Buffering and SPL self-managing.
Cache – Retrieve data based on buffer file.
SPL self-management –Retrieve data through the custom SPL statement.
Parameter: If an esProc file defines parameters, ReportLite will automatically load parameter names from the esProc file into the parameter list. Parameter names in the parameter list correspond to those defined in the esProc file. Parameter values can be regular values or report parameters. When using report parameters as parameter values, we can compute them through expressions (here report expression syntax is used) and pass their results to the esProc file as parameters.
Note:
When a data set is used to make a big report and a custom buffer file needs to be defined for the esProc data set, the Cache file varname should be set as esProc buffer file variable.
● Example:
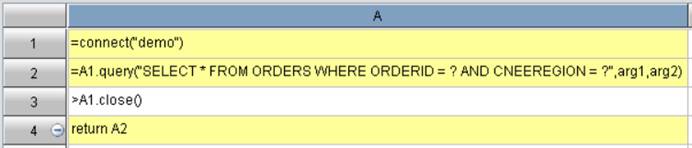
Below is content of an esProc file:
1. Click “Add” button in “Dataset Config” window to pop up the following “Define Dataset Type” dialog:
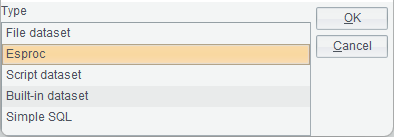
2. Select “Esproc” data set type, and click “OK” button to get into “esProc dataset” edit interface, as shown below:
3.
Click ![]() button after “SPL” to
select an esProc file:
button after “SPL” to
select an esProc file:
![]()
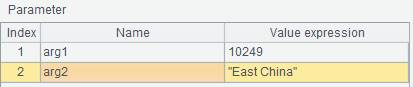
ReportLite automatically loads parameters from the esProc file into the parameter list:
4. Click “OK” button to create the Esproc data set.
To learn more about esProc data set, see esProc Data Set in Tutorial.
●Note: An esProc file used as the Esproc data set can directly use db.query() function if it is the report’s currently connected data source and as the application has a mechanism that automatically connects to the database in this case. If it isn’t he report’s currently connected data source, you need to establish the connection to the esProc file through connect(”db”) function before performing queries and close the connection using close() function after queries are over.
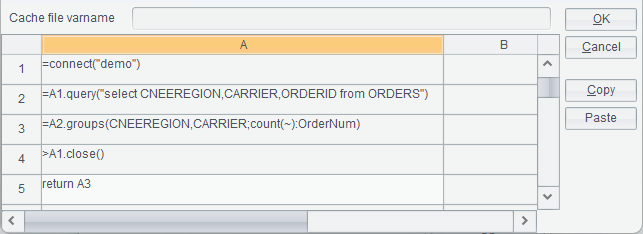
Example: The following SPL file uses the same data source as the report uses, so it can directly use db.query() function to perform queries:
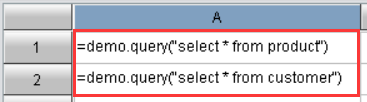
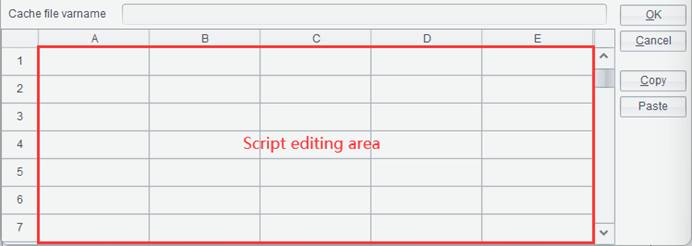
You can add a computing expression directly in the script editing area (highlighted in red box in the following figure). The result set is returned to ReportLite data set through return statement or without it (without the return statement and if the last statement of the script is held in an assignment cell, its result will be automatically returned). The expression in the script edit area should conform to esProc syntax.
Below is “Script dataset” interface:
Cache file varname: This option is used to set buffer file name for the convenient of calling the buffer file in the script when the data set is for generating a big report.
Note:
When a data set is for generating a big report, the script must return a cursor.
● Example:
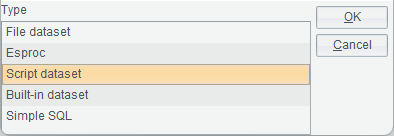
1. Click “Add” button on “Dataset Config” window to pop up “Define Dataset Type” dialog:
2. Select “Script dataset” type and click “OK” button to get into “Script dataset” edit interface, as shown below:
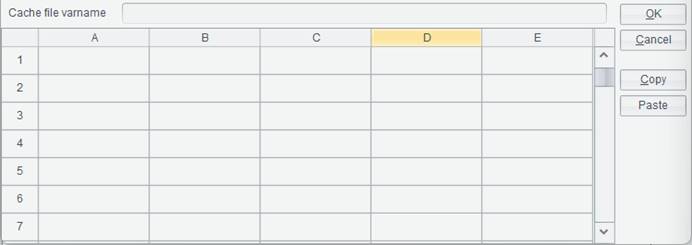
Edit a script in the script editing area or paste an existing script here (select a cell and click “Paste” button). If parameters need to be passed to the script, you can define them in the parameter list of the report file, where parameter name are those defined in the script.
3. Click “OK” button to generate the script data set.
●Note: Same as the case for the Esproc data set, a script used as the script data set can directly use db.query() function if it is the report’s currently connected data source and as the application has a mechanism that automatically connects to the database in this case. If it isn’t he report’s currently connected data source, you need to establish the connection to the script through connect(”db”) function before performing queries and close the connection using close() function after queries are over.
A file data set refers to a data set that gets data from a file, which can be txt, xls, xlsx, csv, btx (bin file) and ctx (composite table file).
When the file is a btx file (bin file) or a ctx file (composite table file), you can only retrieve data from a base table.
Below is “File dataset” interface:
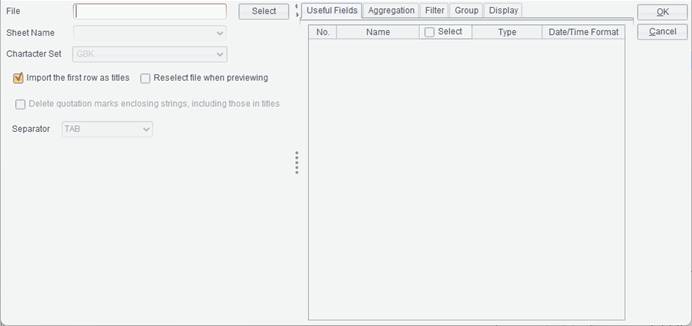
File: The file name, which supports absolute path or relative path. When using a relative path, the path does not need to be preceded by the slash /. The relative path is relative to the Resource directory configured in Tools -> Options -> File; the property corresponds to the path in home property in configuration file raqsoftConfig.xml’s <Report>.
Sheet Name: When the file type is Excel, the option is used to select different worksheets in the Excel file.
Character Set: The character set for a text file or a CSV file. The character set types include GBK and UTF-8.
Import the first row as titles: Whether or not to use content of the first row in the file as titles by checking or unchecking this option.
Reselect file when previewing: To view data in the data set or preview the data set, you can reselect the data set file on the pop-up “Reselect dataset file” dialog.
Delete quotation marks enclosing strings, including those in titles: Whether or not to delete quotation marks in the outermost layer of a string.
Separator: The separator for separating fields of a text file. Types of separators include TAB, comma (,) , space, vertical line (|), dash (-) and underline (_).
Note: The separator for separating fields in a CSV file can only be the comma.
Begin Row/End Row: When the file type is Excel, there will be Start Row/End Row option for determining the number of rows to be retrieved from the Excel file.
When selecting File dataset, sometimes there is a huge volume of data in the source file. In order to avoid loading unwanted data and memory overflow, you can use the following method to reduce size of the target data set:
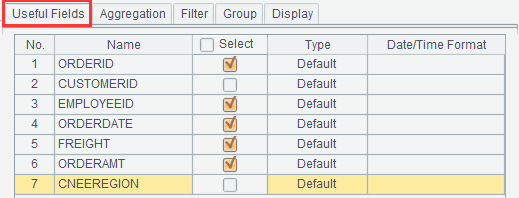
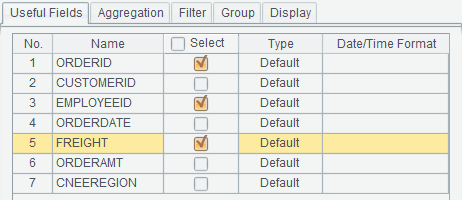
Useful Fields: Select the source file and then target fields.
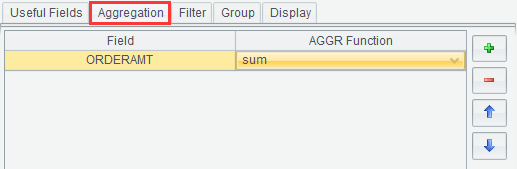
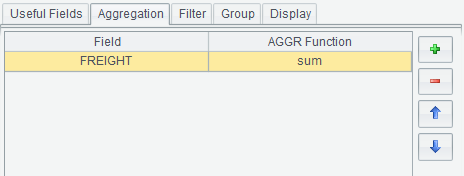
Aggregation: Perform aggregation on a field.
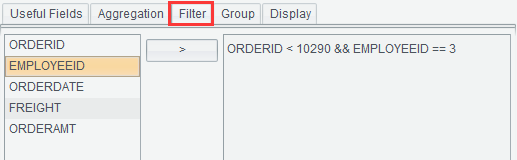
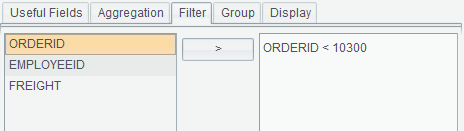
Filter: Perform filtering to get records meeting the specified condition, where parameters are not allowed. The filter condition should meet the specified Boolean expression; multiple Boolean expressions can be concatenated through the logical operator, such as && and ||.
Group: Select the field by which records are grouped and summarized.
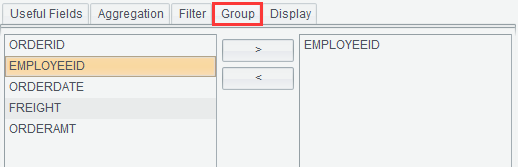
Note: “Group” and “Aggregation” should work together. Configuring “Group” alone is invalid and only the original data will be obtained.
Display: Fields to be displayed in the to-be-generated data set.

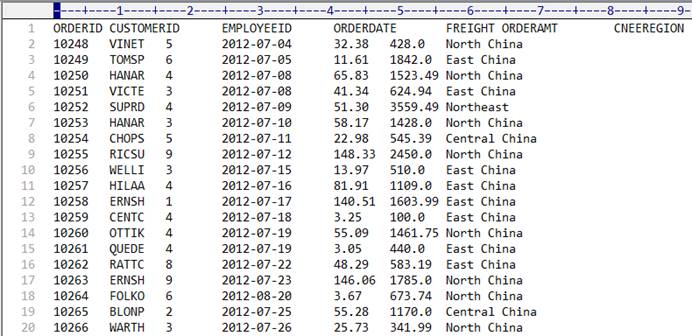
● Example: Create a File dataset based on orders.txt.
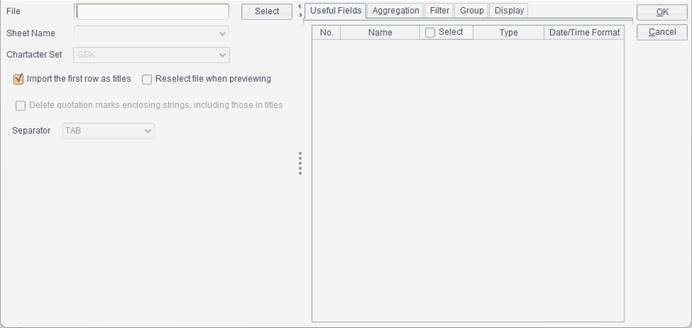
1. On “Dataset Config” shown in figure 1.4.2.2-1, click “Add” button to pop up the following “Define Dataset Type” dialog:

2. Select “File dataset” type and click “OK” button to get into the following “File dataset” interface:
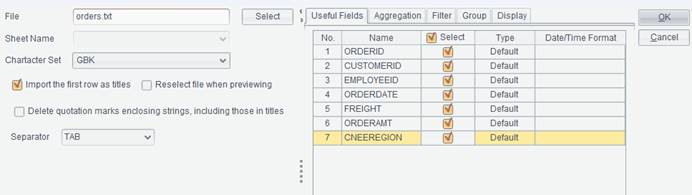
3. Click “Select” button to select orders.txt or just enter the file path. For instance, when the Resource directory on File tab in Tools -> Options is C:\raqsoft\ReportLite\demo and orders.txt is located in demo folder, just enter orders.txt.
4. Select the character set the file uses, and default is GBK. By default, “Import the first row as titles” is checked. Then select the “Separator” between fields, whose default is TAB. Now “File dataset” interface becomes as follows:
5. Select “Useful Fields”, set aggregation operation, filter condition, grouping field and to-be-displayed fields in the data set.
The useful fields selected are ORDERID, EMPLOYEEID and FREIGHT:
Perfrom sum on FREIGHT field:
Set filter conditon as ORDERID < 10300:
Group records by EmpID:

Select fields to be generated in the data set:

Click “OK” button to finish creating the File dataset.
A Built-in dataset refers to a data set whose structure and data are stored in report template, so there is no need to retrieve data from the data source during report computations. This lets users to make a report fast and conveniently by defining only a Built-in dataset in ReportLite designer and entering certain data into it. The user experience improves greatly. It also can be used for monitoring and debugging reports. If the report preview effect is not what you expected, you can transform the data set to a Built-in one and give the report template to technical support team for their convenience of monitoring and debugging.
Below is “Built-in dataset” interface:

● Example: Create a Built-in dataset containing name and age.
1. On “Dataset Config” window shown in figure 1.4.2.2-1, click “Add” button to pop up the following “Define Dataset Type” dialog:
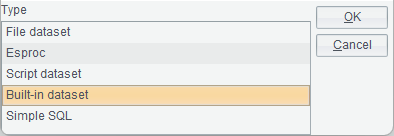
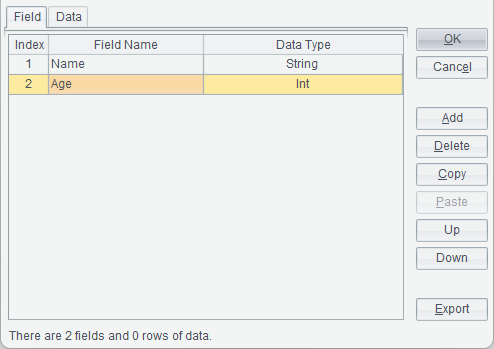
2. Select “Built-in dataset” type and click “OK” button to get “Built-in dataset” window, through which you define fields and data values for the data set. On “Field” tab, you define fields in the Built-in dataset. Click “Add” button the right side and a new field definition appears in the field list on the left side. You can modify field name and the field’s data type as needed. For instance, define Name field and Age field for the data set, as shown below:
3. Switch to “Data” tab, where you click “Add” button to add values under the fields, as shown below:
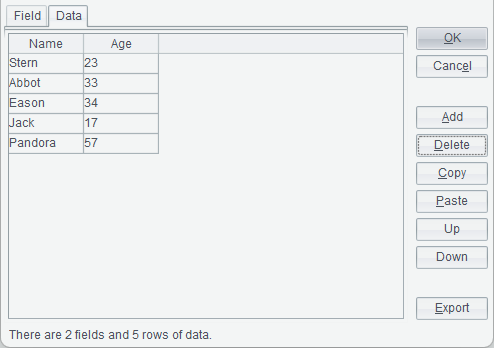
You can also copy the existing data in an Excel file and paste it to the Built-in dataset. First, copy data values of an Excel file. Then click “Paste” button on “Data” tab in “Built-in dataset” window to past the copied data to the Built-in dataset.
4. Click “OK” button to finish creating a Built-in dataset.
You can transform an external data set to a Built-in dataset or restore a Built-in dataset to an external data set.
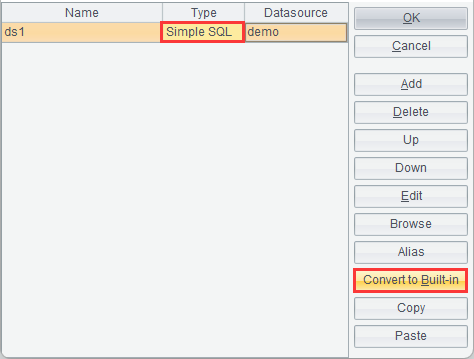
On “Dataset Config” windows shown on figure 1.4.2.2-1, select a data set in the data set list and click “Convert to Built-in” button to convert an external data set to a Built-in one, as shown below:
After data set ds1 is converted to a Built-in dataset, the “Convert to Built-in” button is changed to “Recover”. Now select ds1 in the data set list and click “Recover” button, the Built-in dataset is restored to the original “Simple SQL” data set, as shown below:
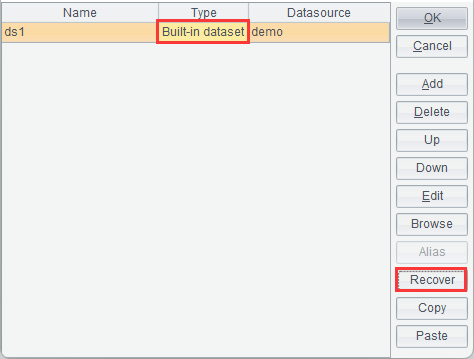
●To restore a Built-in dataset to an external one, the former should be a data set converted from an external data set. A Built-in dataset created by the user cannot be restored to an external data set.