The Server Cluster
There are two forms of parallel computing - the multithreading executed on a single computer and the cluster computing executed across a cluster system formed by a unified group of computers.
This section discusses configuration of clustered servers and server cluster application in esProc, giving you basic ideas about the cluster computing.
10.1.1 esProc server cluster
A cluster computing system usually consists of multiple nodes. There is a main node at the highest level of all processes that controls the computing jobs on all nodes. A running node receives computing tasks, computes local cellset files and returns results to the main node. In a cluster network, nodes may run on multiple machines or a single machine. Each node is identified through the IP address and the port number. In a cluster system, one computational transaction is called an assignment; each assignment consists of one or more tasks. Tasks are assigned to nodes by the main node for execution. One node can perform multiple tasks concurrently. All running nodes form a cluster system for parallel processing.
esProc provides the server class – com.scudata.ide.spl.ServerConsole – to get addresses and ports according to the configuration files and to launch clustered servers.
esProc parallel system hasn’t a certain single "manager" node centrally conducting a group of "worker" nodes. An available computer is designated to serve as the provisional node for execution of each parallel task.
Yet each assignment has its logical center – the main node – from which instructions are given and to which results are returned for being combined. The task usually fails if a node malfunctions; in certain cases, the main node will redistribute the subtask to another capable one. To know more about the execution of parallel tasks in esProc, see Cluster computations.
Data can be also stored on a Network File System (NFS), such as HDFS, over which it can be accessed by the computing nodes. The NFS redundancy management is simpler than the strategy of storing data on certain computing nodes for fault-tolerance. But compared with accessing files stored locally, it may sacrifice some performance due to the network transmission.
10.1.2 Configuring clustered servers
Run the esprocs.exe file under esProc installation directory’s esProc\bin path to launch or configure clustered servers. The jars needed by the file will be automatically loaded under the installation directory. Note that the configuration files – raqsoftConfig.xml and unitServer.xml – must be placed under the esProc\config path in esProc installation directory. The following window pops up after the server is started:
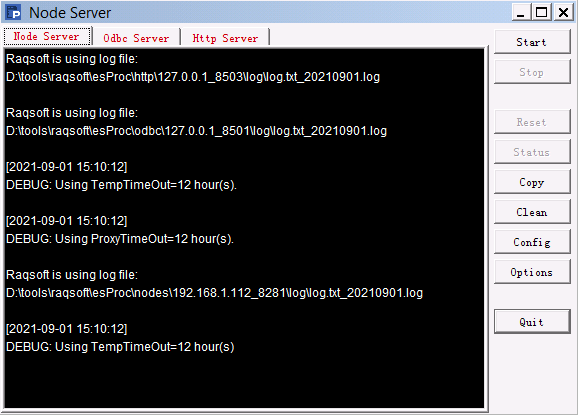
During the execution of esprocs.exe, the window displays the loaded initial information, which is set in the configuration file raqsoftConfig.xml. Click Options on the right-side menu to configure information of clustered servers. We have the following pop-up window and modify the main path:
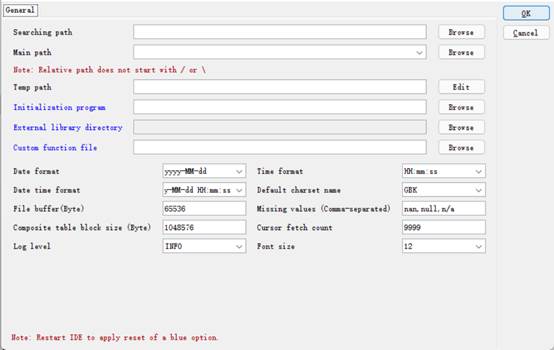
On the page, you can configure main path, search path, date and time format, default charset, log level, number of bytes in the file buffer area and other information. For the Log Level, there are OFF, SEVERE, WARNIGN, INFO, AND DEBUG, whose priorities decrese from left to right. The OFF level turns of any log output. The INFO level outputs information of levels on and below it, including SEVERE, WARNING and INFO. Other levels also output information in this way.
The configuration information is the same as the configuration in esProc IDE. It can be viewed or modified in Tool>Options>Environment:
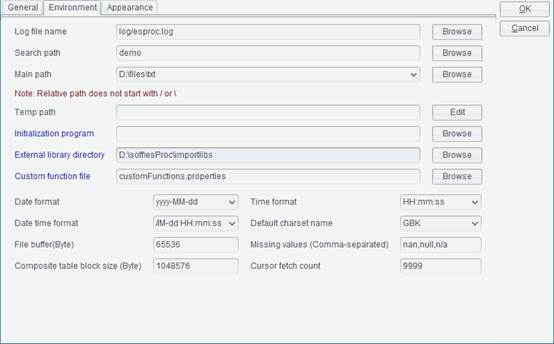
When exiting a clustered server from esProc IDE or changing configurations of a node, the current or modified configuration parameters will be saved in raqsoftConfig.xml. So, pay attention to the probable collision when modification is needed.
Click Config on the right-side menu to configure node information on Node page:
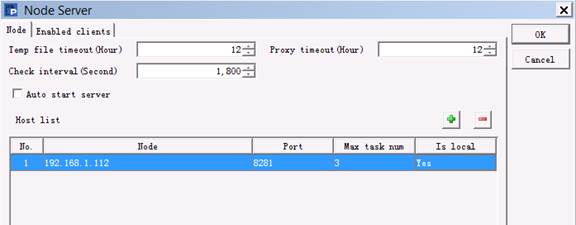
Temp file timeout sets the life span (Hours) for a temporary file. Check interval is the number of seconds between two expiration checks, which must be a positive value or 0. Proxy timeout is the agent life span, i.e. the remote cursor and task space’s life span (Hours). Do not perform expiration check if Temp file timeOut or Proxy timeout is set as 0.
Under Host list, you can configure IP addresses and port numbers of all nodes on the local machine that potentially can run servers. A server, at the launch, automatically searches the node list for an idle one that will be given an assignment to execute. The IP address should be real, and multiple IP addresses are allowed when there are network adapters. Auto start server, once selected, will automatically start clustered servers after the server cluster begins to run.
Under Host list, Max task num is the maximum number of tasks a node is allowed to perform. For a same IP address, you can configure multiple nodes that access data in different data zones.
The Node Server’s Enable clients tab offers the settings of client-side whitelist:
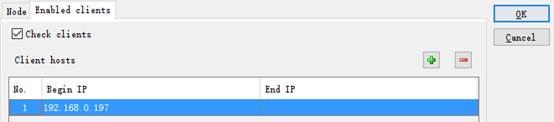
Select Check clients to configure an IP whitelist that can invoke clustered servers under Clients hosts. IP addresses that are not in the whitelist cannot invoke clustered servers for computations.
When configurations for clustered servers are done, click OK to automatically set the corresponding configuration file unitServer.xml, as shown below:
<?xml version="1.0" encoding="UTF-8"?>
<SERVER Version="3">
<TempTimeOut>12</TempTimeOut>
<Interval>6</Interval>
<ProxyTimeOut>12</ProxyTimeOut>
<Hosts>
<Host ip="192.168.1.112" port="8281" maxTaskNum="3" preferredTaskNum="4">
>
</Host>
</Hosts>
<EnabledClients check="true">
<Host start="192.168.1.112">
</Host>
</EnabledClients>
</SERVER>
10.1.3 Launching clustered servers
Now click on Start button on the following window to run clustered servers. Click Stop to suspend the server service; after that, you can click Quit to exit the service. Click Reset to initialize and restart the server and to remove all global variables and release memory at the same time.
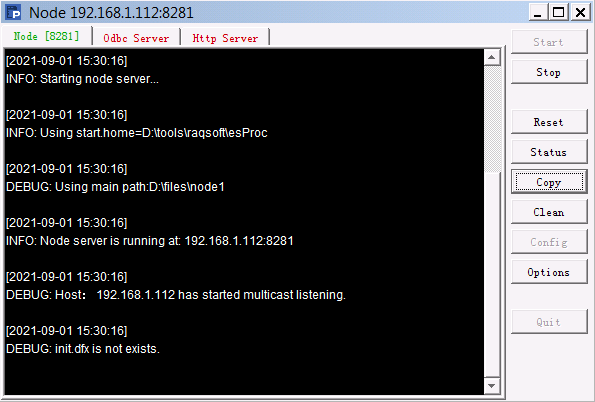
The node starting action will start the unstarted nodes in the specified node list. We can view the execution information on corresponding node window.
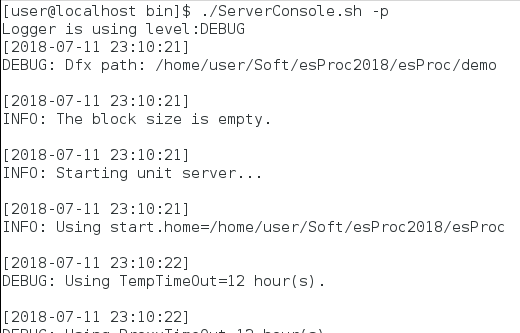
Run ServerConsole.sh to launch the server cluster class under Linux:
![]()
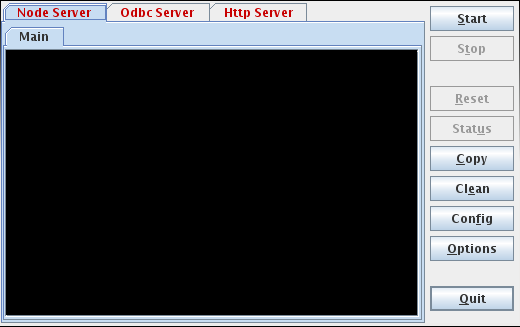
The node running information window under Linux is the same as that under Windows:
We can also add the –p parameter in the execution command to launch a clustered server in a non-GUI way to directly execute operations on it:
10.1.4 Application
callx instruction is used in a cellset to distribute subtasks among running clustered servers. Here’s the cellset parallel01.splx:
|
|
A |
|
1 |
=file("PersonnelInfo.txt") |
|
2 |
=A1.import@t(;pPart:pAll) |
|
3 |
=A2.select(State==pState) |
|
4 |
return A3 |
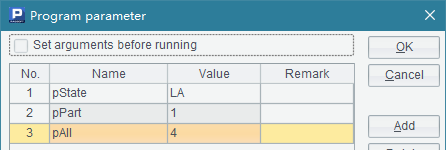
The program imports a data segment from the personnel information file PersonnelInfo.txt and selects employees coming from the specified state. Here are the cellset parameters used in it:
The main program invokes parallel01.splx to find out all employees from Ohio concurrently using cluster computing:
|
|
A |
|
1 |
[192.168.1.112:8281] |
|
2 |
=callx ("D:/files/splx/parallel01.splx","OH",to(20),20;A1) |
|
3 |
=A2.conj() |
A1 specifies a list of parallel servers for computation. A2 uses callx to invoke these servers to execute parallel computing. When executed, A2’s result is as follows:
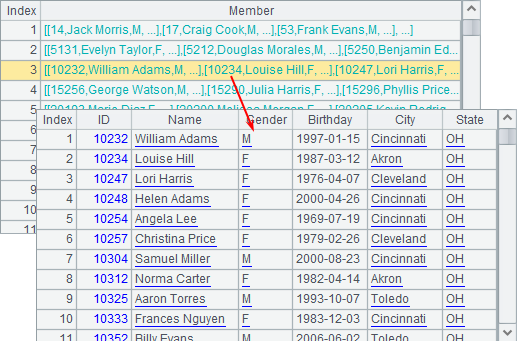
An assignment, when performed across a server cluster, will be split into multiple tasks according to the number of parameters to be distributed among clustered servers. Then each server will allocate its task to the processes running on it which will return results separately. A2’s data is a record sequence containing these results which are sequences. A3 concatenates records in these sequences to get the final result:

Through this form of parallel computing, the main program divides a complicated computational goal or a big data computation into multiple tasks, distributes them to multiple servers to compute separately and then joins the results. We will continue the cluster computing discussion in Cluster computations.